MongoDB Sharding Architecture
MongoDB Sharding
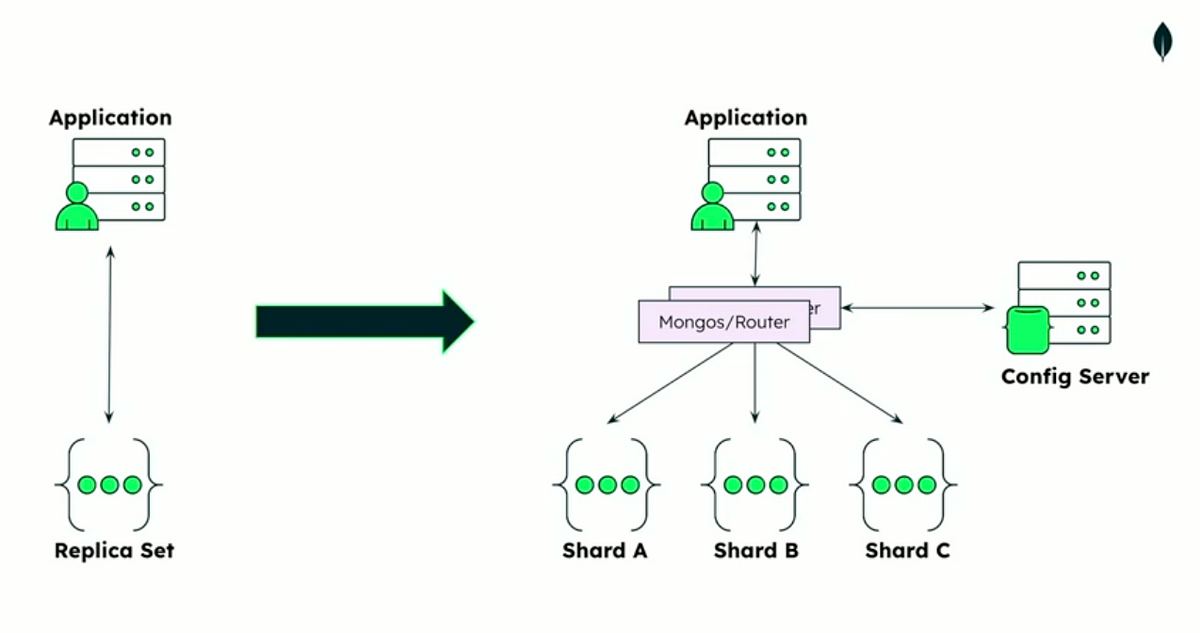
Sharding in MongoDB is a method for distributing data across multiple servers to support deployments with large datasets and high throughput operations. It is a key feature for horizontal scaling in MongoDB. Below is an explanation of the MongoDB sharding architecture and the step-by-step process to set it up.
MongoDB Sharding Architecture
Key Components of Sharding
Shard
A shard is a single MongoDB instance (or a replica set) that stores a subset of the sharded data. Each shard is responsible for a portion of the data in the sharded cluster.
Config Server
Config servers store metadata and configuration settings for the sharded cluster. This metadata includes information about the shards, chunks (data partitions), and the shard key.
Config servers must be deployed as a replica set for production environments.
Query Router (mongos)
The mongos process acts as a query router, directing client requests to the appropriate shard(s). Clients interact with the mongos instance instead of directly accessing the shards.
Shard Key
The shard key is a field or set of fields in the documents that determines how data is distributed across shards. Choosing an effective shard key is critical for balancing data distribution and query performance.
Chunks
Data in a sharded collection is divided into chunks, which are contiguous ranges of shard key values. MongoDB automatically balances chunks across shards to ensure even data distribution.
Sharding Setup Process
Step 1: Set Up Config Servers
- Deploy a replica set for config servers (minimum 3 nodes for production).
- Start each config server with the
--configsvroption:
mongod --configsvr --replSet configReplSet --dbpath /data/configdb --port 27019
- Initialize the replica set:
rs.initiate({
   _id: "configReplSet",
   configsvr: true,
   members: [
      { _id: 0, host: "config1:27019" },
      { _id: 1, host: "config2:27019" },
      { _id: 2, host: "config3:27019" }
   ]
});
Step 2: Set Up Shards
- Deploy replica sets for each shard (minimum 3 nodes per shard for production).
- Start each shard server with the
--shardsvroption:
mongod --shardsvr --replSet shardReplSet1 --dbpath /data/shard1 --port 27018
- Initialize the replica set for each shard:
rs.initiate({
   _id: "shardReplSet1",
   members: [
      { _id: 0, host: "shard1a:27018" },
      { _id: 1, host: "shard1b:27018" },
      { _id: 2, host: "shard1c:27018" }
   ]
});
Step 3: Start the Query Router (mongos)
- Start the
mongosinstance and specify the config server replica set:
mongos --configdb configReplSet/config1:27019,config2:27019,config3:27019 --port 27017
The mongos process will act as the entry point for clients.
Step 4: Add Shards to the Cluster
- Connect to the
mongosinstance using the MongoDB shell:
mongo --host <mongos_host> --port 27017
- Add each shard to the cluster:
sh.addShard("shardReplSet1/shard1a:27018,shard1b:27018,shard1c:27018");
sh.addShard("shardReplSet2/shard2a:27018,shard2b:27018,shard2c:27018");
Step 5: Enable Sharding for a Database
- Enable sharding for a specific database:
sh.enableSharding("myDatabase");
Step 6: Shard a Collection
- Choose a shard key for the collection (e.g.,
{ userId: 1 }). - Shard the collection:
sh.shardCollection("myDatabase.myCollection", { userId: 1 });
Step 7: Monitor and Manage the Sharded Cluster
Use the following commands to monitor the cluster:
- Check shard status:
sh.status();
- View chunk distribution:
db.myCollection.getShardDistribution();
- Check balancer status:
sh.isBalancerRunning();
mongorestore --drop --dir=/path/to/dump